Fun things to try with your Flipper Zero (and wifi devboard)
last update: 14-10-2022
After having messed with my Flipper Zero for a while I figured it’d be good to share my experiences, and list things I found and tips and tricks for new/other owners of the device.
Base functionality
The Flipper Zero has a lot of a antennae, connectors and other ways to connect with the things around it. You can extend this even further by plugging modules into the GPIO header and writing plugins for the device that allow you to use this extra hardware, similar to having modules on an Arduino.
The base hardware contains:
- A sub-ghz antenna that can be used on the 300-390, 418-438 and 868-915mhz bands
- A IR transmitter/receiver on 800-950nm at 300mw
- Low level NFC chipset that can execute direct commands (Like HydraNFC)
- RFID with AM, PSK, FSK modulation
- 3.3v CMOS 5v tolerant GPIO bus (up to 20mA per pin)
- Bluetooth LE 5.0
- SD card reader using the SPI bus (make sure you get a decent SD card that supports that!)
- 100-2500 Hz coin buzzer/speaker
- 30nm 13500rpm vibration motor
- iButton 1-wire emulation and physical read/write socket
- USB 2 that can emulate HID devices and other things
Note that most of the spec data can be found on the official website: flipperzero.one
Basic things to try with your Flipper
There’s a lot of things you can try to do with it even without modifying the firmware or uploading anything! The only real requirement to using it, is having an SD card in it. Without an SD card it won’t be able to perform much of its functions as it needs some storage for everything from assets to temporary data while recording things.
Things to try
- Try recording your front doorbell if it’s a wireless one! Many of these are not well protected and will send a very basic 433 or 868mhz signal to the receiver. You can do this by opening the sub-ghz menu, checking what frequency it is on using the Frequency Analyzer, and then trying to Read it. If it can’t be received using the Read function, you can try the Read Raw function. When you play back the sample, the doorbell should ring, if it doesn’t, you may have a well protected doorbell (congrats!)
- Try turning on/off TVs and devices using the IR function, and create a new custom remote for some device that you own. It’s a basic thing but it never gets old to be able to control any IR controlled device wherever you go, as these are rarely ever well protected or paired with their remote in any way!
- Do the trash containers require an access card where you live? Try copy it with the NFC or RFID function! It should be fairly trivial, most of these aren’t well protected, although occasionally you run into one with higher protection levels.
- Got a Tesla? You can open the charging port using a simple 433mhz signal which supposedly works across all Teslas.
- Many hotel and building and other access cards are simple RFID or unprotected NFC badges that can be copied
- Same goes for many garage door openers, parking lot gates and a lot of other similar devices, once you find a signal source you can copy.
Music
Another joyful part of the vanilla firmware is the Music Player. The music player accepts a specific file format (FMF - Flipper Music Format), that basically lists the notes and duration in text form. There’s a surprising amount of music already out there I found, you can check these link for more info:
- https://forum.flipperzero.one/t/music-player-songs/2715/13
- https://www.reddit.com/r/flipperzero/comments/ur7pfx/music_player/
- https://github.com/juanirming/flipnoise
Things you can do to upgrade/extend your Flipper
There are a ton of things you can do to extend the functionality of your Flipper zero; There are a whole list of advanced firmwares that both unlock the locked down features, as well as extend the device with community suggestions, patches and extra functionalities.
Unleashed Firmware
A good example of this is the Unleashed firmware, which is the one I personally tested and use the most on a daily basis. It’s solid and it has a lot of extra features that allow you to e.g use the Wifi Marauder modules (or firmware for the flipper dev board).
Installation
Installing it is as simple as going to the release page with a Chromium based webbrowser and hit ‘web install’, hook up your flipper and you’re good to go! Also note the Extras package, which you can upload to your Flipper using the qFlipper application’s filebrowser, or an SD card reader.
Extras you get at the time of writing (from the readme.md):
- SubGHz regional TX restrictions removed
- SubGHz frequecy range can be extended in settings file (Warning: It can damage flipper’s hardware)
- Many rolling code protocols now have the ability to save & send captured signals
- FAAC SLH (Spa) & BFT Mitto (secure with seed) manual creation
- Sub-GHz static code brute-force plugin
- LFRFID Fuzzer plugin
- Custom community plugins and games added
- Extra SubGHz frequencies + extra Mifare Classic keys
- Picopass/iClass plugin included in releases
- Recompiled IR TV Universal Remote for ALL buttons
- Universal remote for Projectors, Fans, A/Cs and Audio(soundbars, etc.)
- BadUSB keyboard layouts
- Customizable Flipper name
- SubGHz -> Press OK in frequency analyzer to use detected frequency in Read modes
- SubGHz -> Long press OK button in SubGHz Frequency analyzer to switch to Read menu
- Other small fixes and changes throughout
- See other changes in changelog and in readme
As you can imagine this gives you quite some extra freedom. It also includes apps and plugins to give you compatibility with the Wifi Marauder devices and Flipper Developer board firmware, allowing you to scan for Wifi networks and run (lightweight) attacks against them- Obviously the Flipper Zero doesn’t have a lot of compute power even with the ESP32 devboard attached, but that doesn’t mean you can’t beacon spam or deauth spam, or do other shenanigans alike. See the wifi devboard section for more info.
Checking the temperature/humidity
If you have a HTU21D or Si7021 sensor laying around, you can try this flipper plugin to interface with it, and read out the humidity and temperature! Also a very good example if you want to write your own sensor plugins!
Writing your own plugins
You can in fact write your own plugins! The process is currently still a little involved, though. And it also deserves to be said that I have personally not yet tried this, but I intend to do so soon, so I want to collect the relevant information here in advance.
Originally they advertised Arduino compatibility, however none of that is currently working yet. What you CAN do however, is compile extra LFS binaries while you’re also compiling the official firmware (because it needs to be compiled against the official headers/etc).
An example Hello World application can be found here. One thing I noticed is that it seems to imply the application names have to be included in the applications.c part of the firmware to show up, however with the Unleashed firmware I could just drop the Extras package in without having to recompile anything.. so I wonder if there’s any ways around that.
14-10-2022 update: The Unleashed firmware contains a FAP (Flipper Application Package) loader, so you don’t need to recompile the firmware every time you want to add an app. The vanilla firmware does not have this feature (yet?)
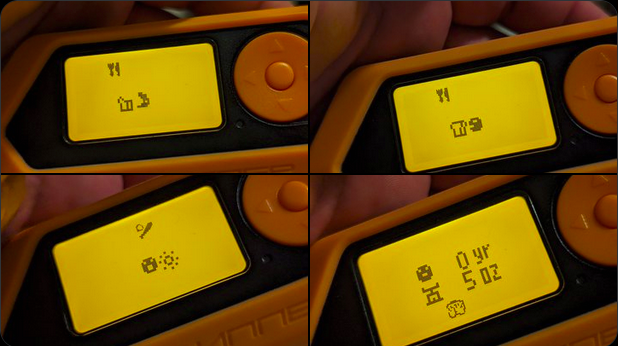
Games
One of the least or most hacky things you can do (depending on how you see it); You can actually run games on the Flipper! The Unleashed firmware comes with a bunch more than the default Snake application already, such as a basic Doom clone, Tetris and some other classics, however if you install the Extras pack you can actually get a full true Tamagotchi firmware running in an emulator:
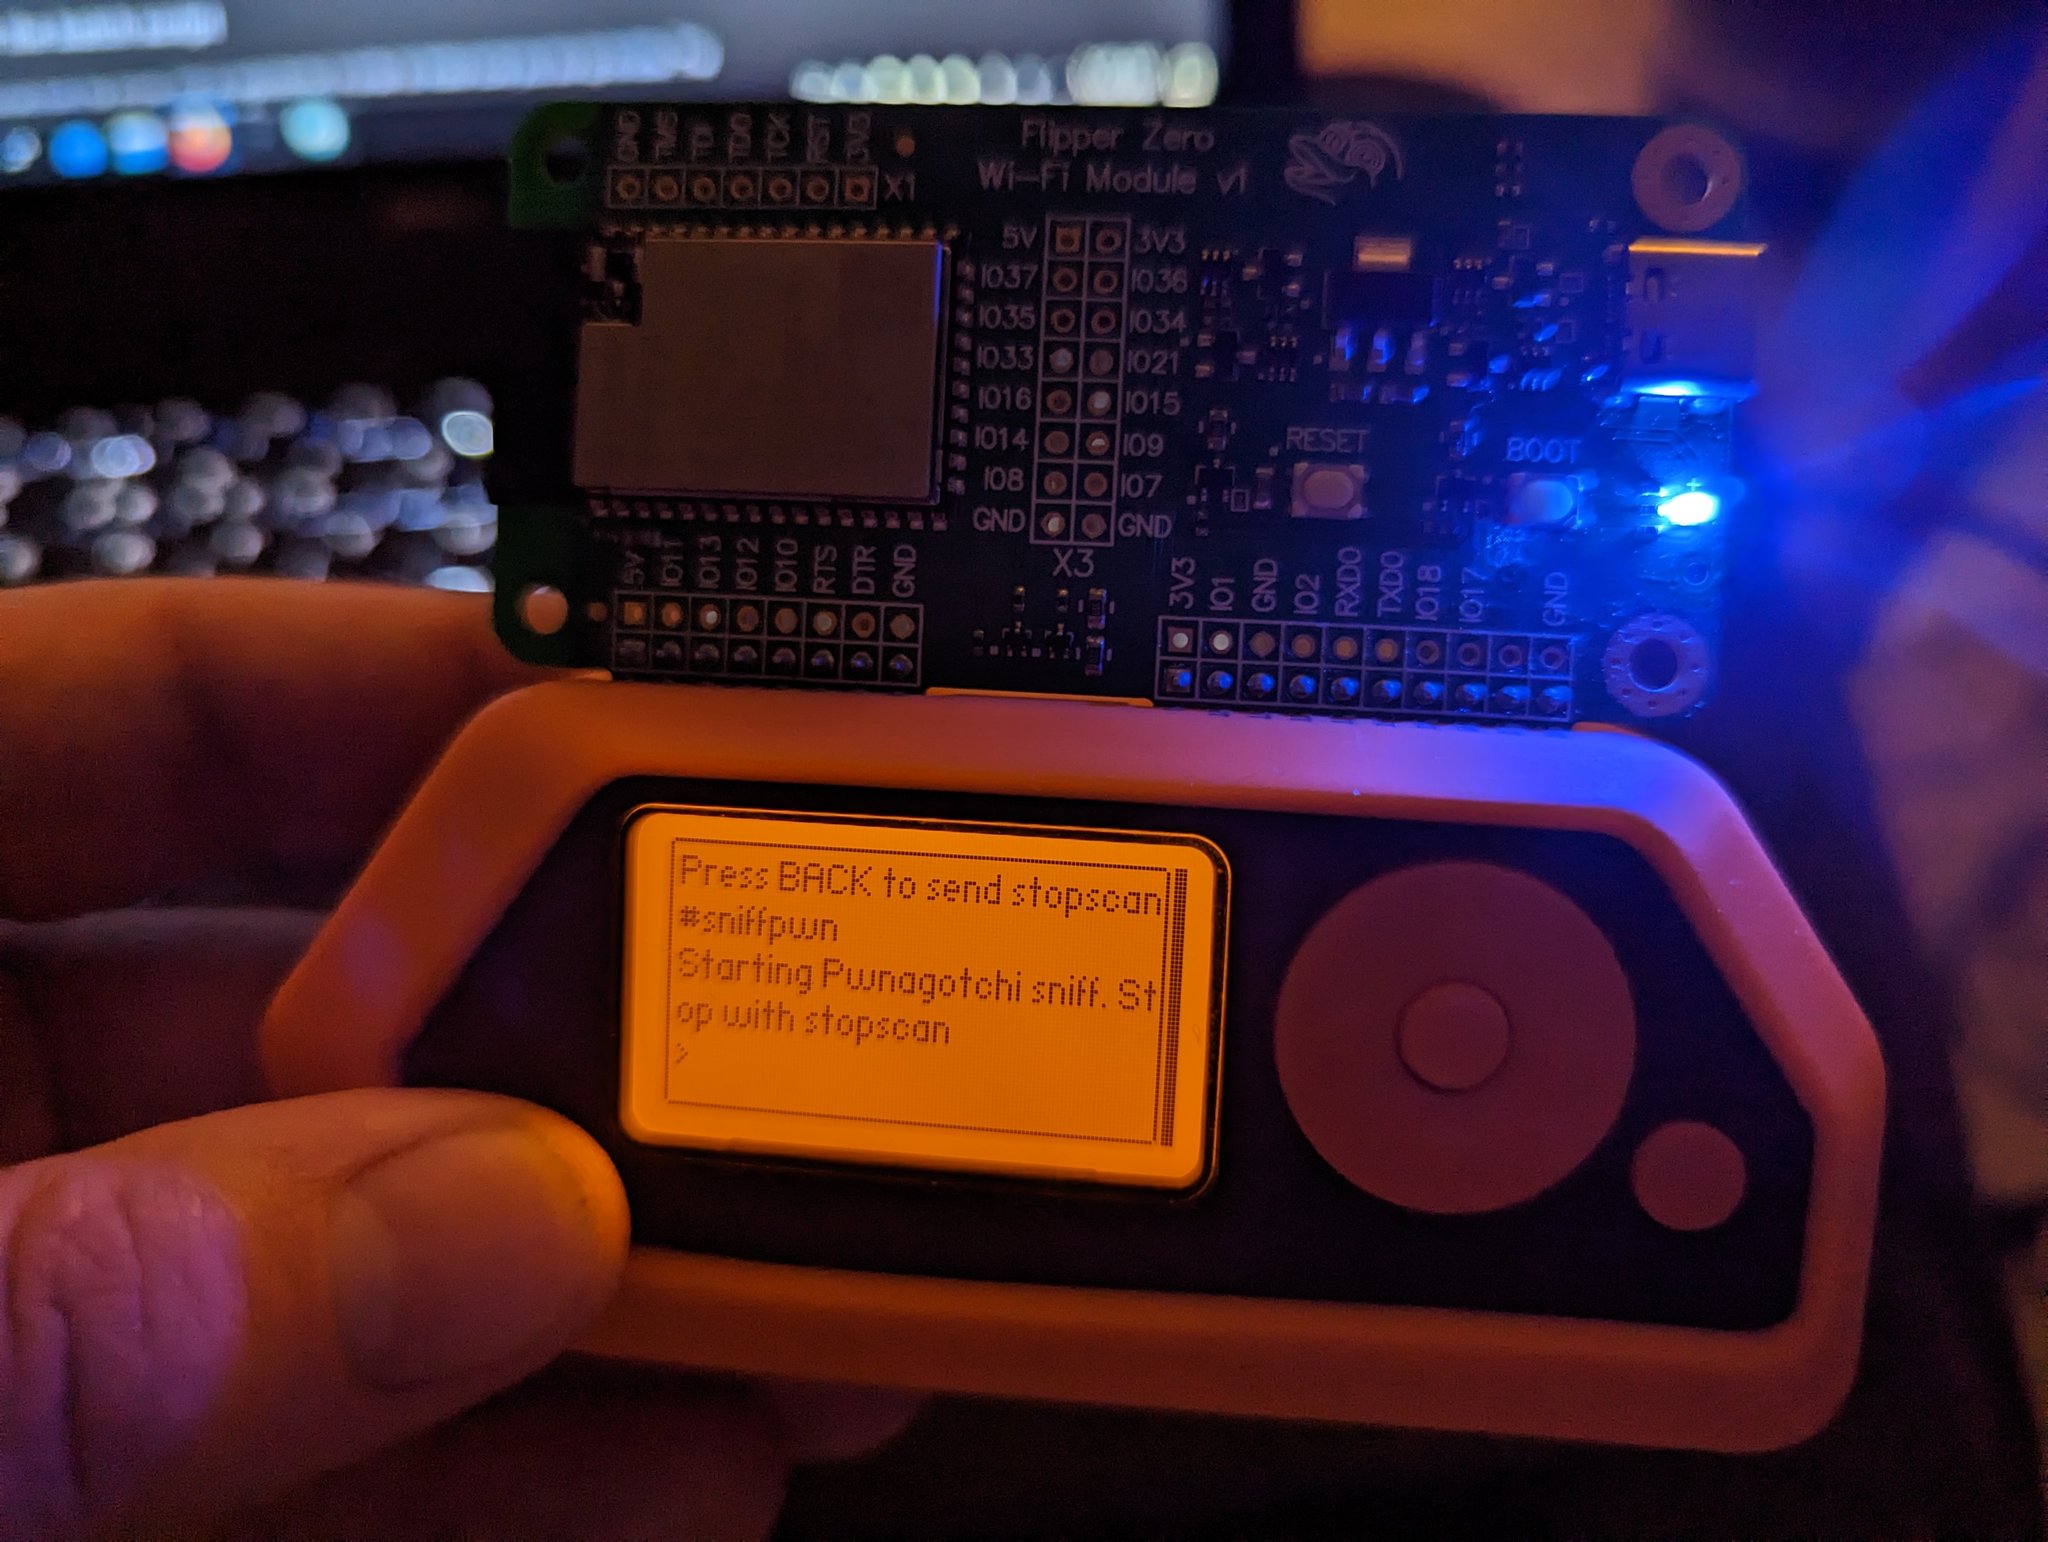
The Wifi Devboard
The Flipper Wifi Devboard v1 is a prototyping board with an ESP32-S2, USB-C, a few buttons and a multicolor LED.
It can be used for a variety of things; by default it comes with the Black Magic probe firmware which allows you to use the GPIO pins from a computer and do jtagging and such. I have not personally used the black magic firmware as of yet.
Another fun thing you can do with the wifi devboard, is installing the Marauder firmware.
This firmware allows you to scan/wardrive for wifi networks (it’s actually pretty sensitive!), and execute simple deauth, beacon spam and pwnagotchi attacks.
Here’s a picture of mine running a Pwnagotchi scan using the Marauder firmware on the Flipper Wifi Dev Module:
Installing the Marauder firmware
I found two easy tools to do this, but it depends on whether you’re on Windows or Linux which one you need:
The procedure should be outlined on those pages, but just to summarize:
- Take the wifi devboard, hold the boot button, and connect it over USB-C.
- Keep holding the boot button for ~3-5 seconds after connection, then release it
- The ESP32-S2 is now in firmware flash mode. This also means you can upload new Arduino blueprints to it if you’d be looking to do this.
- Run the above script, it should give you the option to flash the marauder firmware, which it should automatically download for you.
Notes:
- On windows you may need this driver to detect the serial interface and this driver to detect the serial interface
Experimenting with Arduino Code for the ESP32-S2
While trying to figure out how to get the marauder firmware on there, I found a page that explains how to set up the full stack for the wifi dev board to compile it from scratch. You can also use this page to set up the Arduino IDE to mess with it yourself!
Summary:
- Install the Arduino IDE
- Add the following URLs to Additional Boards Manager URLs:
- https://dl.espressif.com/dl/package_esp32_index.json
- https://raw.githubusercontent.com/espressif/arduino-esp32/gh-pages/package_esp32_dev_index.json
- Go to Tools>Board>Boards Manager, search for esp32 and install esp32 by Espressif Systems (v2 or higher)
- Install this utility for the Arduino IDE to be able to modify the filesystem for the ESP32
- In the Arduino IDE, under Tools>Board manager, select the correct
ESP32-S2 Dev Moduleoption, and set Flash Size to 16MB (128Mb).
You should now be able to upload custom code to the flipper dev board!
Other useful info when trying to work on your Flipper
GPIO layout
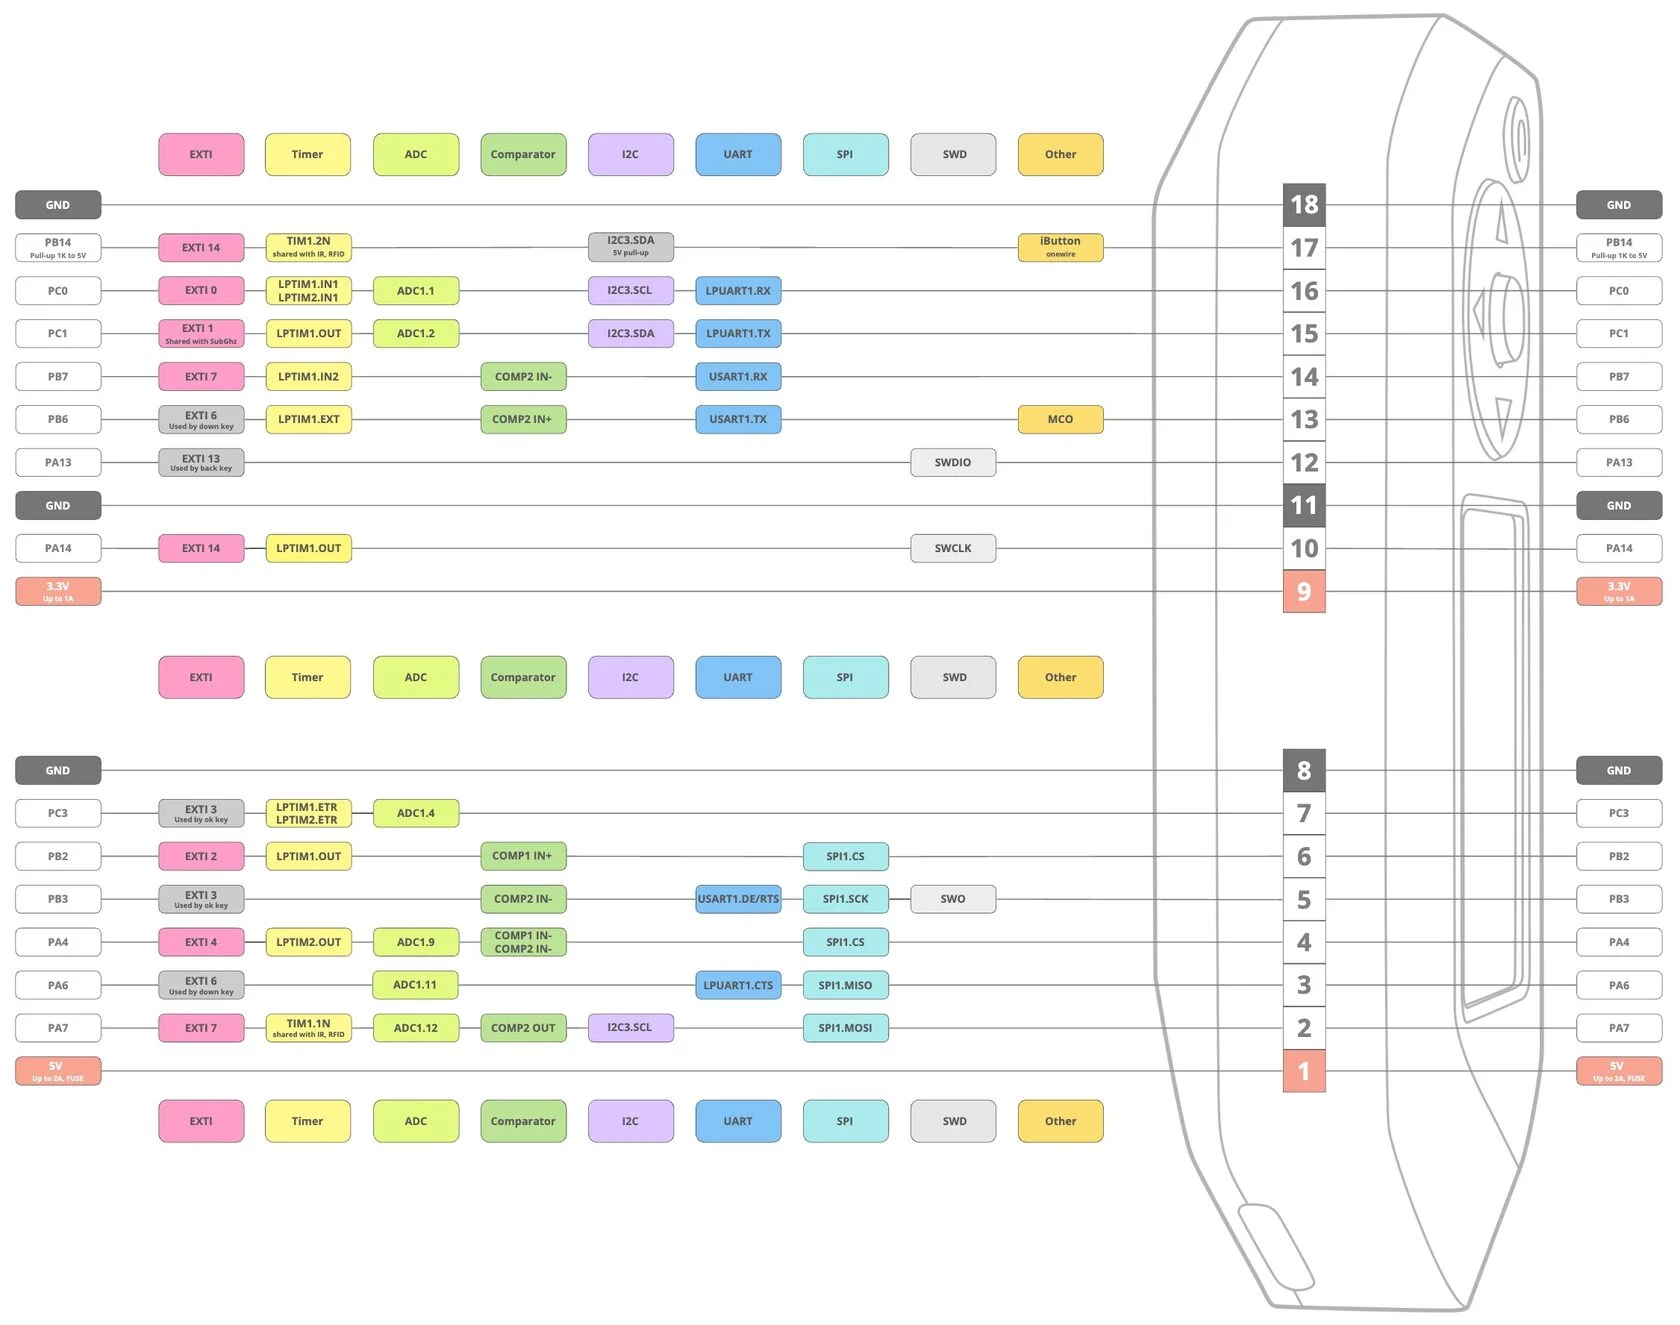
(I will probably extend this guide further later)